Friday, October 5, 2012

The Master Sword!

H'okay. So I know I was working on the N7 armor, but what with the destruction of the helmet (along with the destruction of the Soul Edge I spent 30 painstaking hours creating -_-) I decided to take a break from the project. But, I was recently inspired to finally make myself my own Master Sword, for my Ocarina of Time Dark Link cosplay.


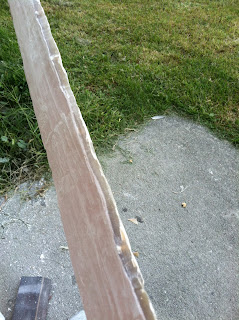
So I started out with two wooden dowels, and after gluing them together (and adding resin for some extra support) I took two long sheets of fiberglass cloth, resined them, then glued them to both sides of the dowels. What you see in the above picture is the "mold" I made. I cut the two sheets of cloth to a shape that closely resembles the Master Sword, used about a half of a roll of masking tape to seal it off, and then simply started pouring resin in.


This, and the picture below, are what you get.


Then, it was a simple matter of taking the dremel, and grinding out an edge. I made a mistake, and forgot to add in guidelines, so the jagged edge you see below is the result of me trying to just eyeball it.


Fortunately, the Goddesses of Hyrule saw fit to bless me with the wonderful putty known as Bondo. (Or body filler) Which is wonderful for covering up mistakes, and holes, and pretty much everything I did wrong haha.


First world problem: That time between applying Bondo, and waiting for it to dry.


This is the blade (and it's edge) around 90% finished. Most of the uneven-ness has been taken care of, and it was just a matter of filling in some little holes, and sanding them smooth.


Now for the hilt! For the hilt of the Master Sword, I simply just used the same process as before (sorry, I forgot to take photos during this process). Two sheets of fiberglass cloth, glued to the dowels, cut out to the desired shape, then masked off and filled with resin.


This here is me marking out the details for the hilt. Specifically the globe at the base, and the "wings" that form the crosstrees.


With luck, I'll be able to finish this come the end of October. Hopefully once it starts to get cold I'll have an indoor shop to work in.

More updates soon to follow!

Thursday, July 26, 2012

Thirsty? Grab a Nuka-Cola!

Hey all. Decided to go on a little vacation from the N7 Armor, and started a small project.

So, like the heading said, I invented a new drink! Feeling tired, thirsty, or just plain tired of wandering the wasteland and having to stomach that awful stagnant water? Well worry no more! I present to you, Nuka-Cola!


Just kidding. Seriously though, I did make these. As soon as I have enough money to afford some more ink cartridges, I'll have about 15 or so, half full, half empty bottles. And then I'll move on to Sunset Sarsparilla and other Nuka-Cola flavors like Nuka-Cola Quantum, Victory, Quartz, you name it! (Heck I might even invent a few of my own).

Thursday, July 5, 2012

Mass Effect N7 Update

Okay, so the days obviously don't really mean anything. Anyway, onto the Mass Effect armor!

So, the chest piece is successfully finished, save the strapping and any other minor changes I may decide to make later on.

I started painting the back piece, and it's nearly done. Just waiting to glue the detail pieces on to finish painting.


Speaking of detail pieces...

After several errors in trying to make the shield case and successfully cut the details into the back of it, I opted to bondo it instead.
Now, one of the problems with bondo is that it's not very flexible when it's layered on relatively thick, and at the same time, it is very brittle, which, when the entire reason armor sets are made out of EVA foam is that they're flexible, makes for some issues with this. However, I figured that since this was just the shield case and not something that's going to move around a lot, I assumed it was safe. So I continued on to paint.


What I've got here is the shield case at the top, both of the weapon slots on the left and right, and the lower spinal column in the center. I had the same problem with the weapon slots that I had with the shield case, so those too were bondoed, since again, they're on the back and I didn't see them needing to flex very much. For tomorrow. I plan to finish the lower spinal column details, and perhaps start some of the painting process.

Sunday, June 17, 2012

N7 Armor, day 12

Made some pretty significant progress the past couple days, the chest piece is almost entirely done, I just need to finish painting the cod piece and glue it on, and the entire front torso is done! There is still a ridiculously large amount of work to do however. But, here are some pictures for you to enjoy.


Thursday, June 14, 2012

N7 Armor day 11

Been making slow progress, I got Diablo 3, so my attention has been elsewhere >>

That being said, I jumped the gun a little bit and started painting. The upper chest piece is about the only piece I have done, so I figured I'd paint it and see what kind of paints I needed to buy, etc.

Here are some pics, let me know what you think.


Wednesday, June 6, 2012

N7 Armor, day 9

I'm not really sure if it's day 9 or not, but I figure it's close enough to start a count. I restarted the two main back pieces, as I botched the previous ones. Made a discovery that it's better to make one piece every 1-2 days, and take breaks in between, lest I burn myself out.

Anyhoo, the progress!

I cut and marked the details for the arm guards, I yanked the old raised bit off the first one because it turned out a little too meh for my tastes so I pulled it off and re-cut it.


I'm still trying to figure out a good way to make the details that aren't straight lines, the one small grinding bit I had turned out to be pretty useless. So maybe another trip to the hardware store to pick up a couple decent bits is in order.

For other pieces, I cut out the two back pieces and marked half the detail on the neck/upper back, and actually cut the detail on the lower piece, as seen here:


Just gotta keep remembering, slow and steady wins the race! haha.

Anyhoo, I work a little early tomorrow, but I'll see if I can't make some kind of progress. 

Also, if any of you have a facebook account, shoot me a like! (https://www.facebook.com/HappySalesmansProps)


Wednesday, May 30, 2012

Moar N7 updates

More progress. I'm about halfway done with pepping the breather helmet (thank god) It's turning out to be quite a pain. But I've got hopes that when it's all finished it'll turn out great.

Had to re-do the back neck portion of the armor, I learned that it's better to carve the detail pieces out BEFORE you heat gun the piece to shape. Makes it a heckuva lot easier.

Anyway, no pics yet, but I'll post 'em later today.

Saturday, May 26, 2012

N7 Update

Continued work today. Managed to cut out quite a few parts on the EVA foam I picked up yesterday. I learned it does not take that much to dull the xacto blades as cutting became a pain after a little while.

                               I need to re-shape the shin piece, otherwise things are progressing nicely :D

Also, while I have a very very cheap dremel tool (made by chicago electric, it was 13 dollars ><) I like it because it spins slower, so therefore I have more control over it. However, sanding with it has become a hassle, since the sanding wheels like to move around on the bit as I'm sanding, forcing me to stop, put it back on, and start again. Lastly, I had started pepping the helmet, however the gods of pepakura were not shining on me, as the helmet is about and inch or so too small. I naturally find this out about halfway through it. So I had to scrap the entire thing and start over, I am not a happy person right now.

SO MANY LITTLE TRIANGLES!!

More updates to follow

Friday, May 25, 2012

Updates!

So, apologies for the massive lack in updates. School started, so prop making got put on a bit of a standstill. However, I"m baaaack!

What I've got so far today is some photos of the new project I started. I'm making the N7 Armor from Mass Effect 2.


So far, I've finished the Chest, and a few bits and pieces here and there. I just picked up some EVA foam and a heat gun, so progress can continue. Fortunately I have the entire weekend off work, so I can spend the next 48 hours doing nothing but the armor.

In the meantime, here are some update photos, I'll post the process and any available files when I finish it.